
- A Premium Account from Strikingly
- A custom domain from Wix
This guide walks you through the process of hooking up your www and root domain to your Strikingly site. You can send this tutorial to your registrar if you need help. If you're connecting a subdomain, you can visit Connect Wix Subdomains to Your Strikingly Site. Or if you'd like us to connect your domain for you, send us the information here!
- Step 1: Connect to Your Custom Domain on Strikingly
- Step 2: Find Wix's DNS settings
- Step 3: Add an A record on Wix
- Step 4: Add a CNAME record on Wix
- Step 5: Wait for the Records to Take Effect
Step 1: Connect to Your Custom Domain on Strikingly
- Go to your Strikingly site editor, and click SETTINGS > Domains.
- Enter your custom domain in the "Connect a Domain You Already Own" box, such as “yourdomain.com" (without https:// or http:// or /).
- Click UPDATE.
- Choose Others as your domain provider and click “Read Tutorial".
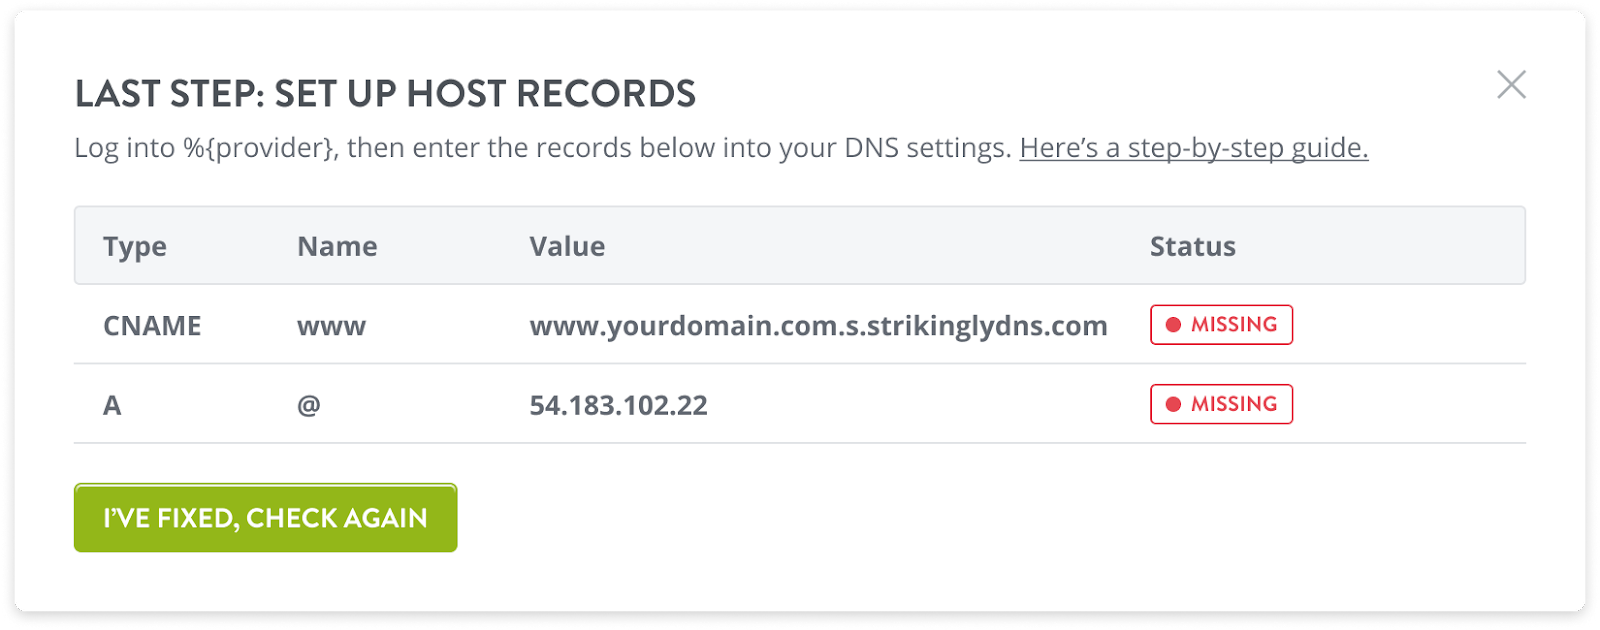
- You will see a pop-up that displays the records you'll need to set in your domain settings.
Note: Type your domain in lowercase to avoid the "Page not found" error when accessing your site.
Step 2: Find Wix's DNS settings
1. Sign in to your Wix account.
2. Mouse over the "person icon" at the top right.
3. Click "Domains".
4. Click the icon next to your domain.
 icon next to your domain.
5. Select "Manage DNS Records".
Step 3: Add an A record on Wix
1. Go to the "A (Host)" section.
2. Click "+ Add Record".
3. Click "Got it" in the pop-up message.
4. In the "Host Name" field, enter yourdomain.com (this domain is just an example, please change it to your domain name).
5. In the "Value" field, enter 54.183.102.22
6. In the "TTL" field, select 1 hour.
7. Click "Save".
8. Click "Save Changes" in the pop-up message.
Step 4: Add a CNAME record on Wix
1. Go to the "CNAME (Aliases)" section.
2. Click "+ Add Record".
3. Click "Got it" in the pop-up message.
4. In the "Host Name" field, enter www.yourdomain.com (this domain is just an example, please change it to your domain name)
5. In the "Value" field, enter www domain + .s.strikinglydns.com
|
www domain in the value field "www domain + .s.strikinglydns.com" should be your domain name. Here are some examples of how the value should be:
|
6. In the "TTL" field, select 1 hour.
7. Click "Save".
8. Click "Save Changes" in the pop-up message.
Tip: If you can't add a www CNAME record, look for existing CNAME and A records for www and delete them (only for www).
Step 5: Confirm your setup is complete
- After you’ve confirmed the above setup, go back to your Strikingly site editor and click the "I've fixed, check again" button in the pop-up.
-
If you've configured your DNS settings correctly, the pop-up will close and the domain status will show as "connected".
-
If you haven't configured your DNS correctly, the pop-up will display the error status and you should go back to step 3 to configure the DNS records correctly.
Step 6: Wait for the Records to Take Effect
Now that you've set up the domain records. Please allow a few up to 48 hours for the changes in the domain records to take effect globally. Once it's done, HTTPS/SSL will be automatically activated within 24 hours. Be sure to clear your browser cache before you check to see if the domain is working.
Related Articles:
- Connect Wix Subdomains to Your Strikingly Site (e.g. info.domain.com, shop.domain.com)
- Live Site Error "Page not found"
- Live Site Error: "Your connection is not private/secure"
- Troubleshooting: Site is Down
- Standard Troubleshooting Steps
If your site doesn't go online after 48 hours, contact us at support@strikingly.com or chat with us and include a screenshot of your domain settings so we can help!